Step-by-Step Guide for Setting up Your Vertical Garden
- Author: Saiqa Najeeb
- Last Updated On: July 29, 2023

Vertical garden allow you to grow vegetables, fruits, and colorful flowers up on a trellis, on garden netting, in a tower of pots, and over garden structures, while enjoying the benefits of easier maintenance, healthier plants, effortless harvesting, and higher yields.
With this comprehensive guide, you’ll get all the juicy details to set up your vertical garden successfully. Read on to explore the step-by-step process.
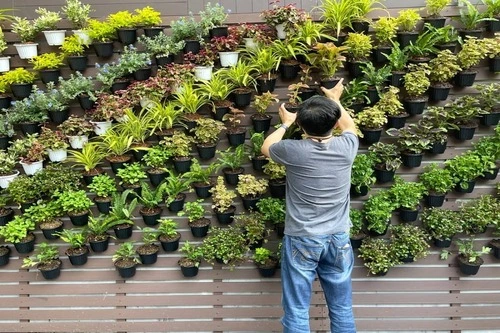
How to implement a vertical garden?

1
Decide on the type of structure.
You can use a wall, a tower of pots, a trellis, or garden netting; a wall is recommended. The good news is that practically any wall will work, and you don’t need to worry about weight load unless you want to develop a really large vertical garden or grow trees. It depends on the wall you select and how much sunlight it receives and what plants you should choose. But if you want to experiment with a certain plant, pick a wall that will give it the ideal conditions for growth.
2
Construct a frame.
A vertical garden wall’s basic construction consists of a sandwich of three layers composed of a frame, plastic sheeting, and cloth. Before hanging it, complete the entire setup. While you may really mount it directly to the wall, it will be much simpler to remove if you build a frame to hang it on the wall. To construct a frame, 3/4-inch PVC pipe, elbows, and four-way joints are recommended. It is recommended t stay away from utilizing metal (because of the added weight and expense) and wood (which needs pressure-treating to prevent moisture rot—you don’t want water clogging the space between a wood wall and the frame’s plastic).
3
Cover with plastic sheeting.
A plastic sheet should be attached to the frame. The plastic supports the cloth layer and deflects water away from the wall. Utilizing expanded PVC sheets is recommended. (Note: You’ll need to ventilate behind if you wish to do this on a wooden wall.)
4
Hang the fabric.
Fix the cloth layer to the frame. Your plants are going to live in this material, which will also serve as their water container. Simply felt carpet padding can be used, but you can use pretty much anything that will hold onto the water without rotting away. A minimum of two layers of cloth are required. As if you were stretching canvas across a frame, fasten them to it directly using stainless steel staples and galvanized screws. You’re good to go as long as the cloth is tight and secure, without any buckling or creases. Simply secure it in a manner such that it won’t fall off and that it looks nice.
5
Install an irrigation system.
You’ll need an irrigation system that can supply moisture throughout the cloth layer to keep plants thriving on a vertical surface. One can be created from poly tubing and locking fittings. It resembles a tube that runs the length of your panel and has emitters at either end that drip water. Purchase them from an irrigation source for the best results. A propagation timer that may be set for seconds rather than minutes is required, although you can purchase a regular valve and irrigation drippers.
Depending on the weather and your specific configuration, you want a fast flow of water for 10 to 15 seconds three to six times per day. In order to keep the wall moist without overwatering the plants, attach an emitter every 2 to 3 inches along the top irrigation tube and experiment. Utilise stainless steel hardware to fasten the frame to the wall (to prevent rusting). If you anticipate wanting to take the frame down, hooks are excellent; otherwise, brackets screwed into the wall and the frame will also work.
6
Connect the irrigation system to the water source and add the fertilising injector.
Use an irrigation valve that sends liquid fertilizer into the irrigation system along with a fertilizer injector, such as Add-It, to fertilize your wall. The irrigation system should then be connected to your water supply and hooked up. A cheap irrigation water filter, which is simple to use, is all you’ll need to filter the water. Keep in mind that there will be some runoff; one solution is to create a flower bed beneath your vertical garden.
7
Select your plants.
When selecting plants that you’ll leave outside all year, consider factors such as sun, shade, wind, humidity, and cold. You might consider storing a detachable wall you’re constructing with evergreens over the winter, when the plants are dormant, in a cool, dry location. The hosta, iberis, ferns, phlox, weigela, and even blueberries are among the plants that thrive on walls. Native plants appear to perform better than non-native ones.
8
Add some plants.
Make a horizontal slit in the fabric with a razor blade to allow plants to be inserted into the top layer. To prevent root rot, remove as much soil as you can from the plant’s root ball and place it in a cut. Create a secure envelope by stapling the fabric to the plastic backing in a semicircle around the root ball using three to five stainless steel staples.
9
Design plants.
The enjoyable part is planning your plantings, and a vertical garden’s height offers a variety of options. Select plants that will extend 2 to 3 feet from the wall and place them at the top of the garden so they can cast shade beneath the wall. But bear in mind that if you do this, you’ll need to plant shade-tolerant species underneath, like ferns.
A plant that is 8 feet off the ground will also frequently droop. You’ll need to clip it back since while it creates a lovely waterfall impression, it also smothers whatever that is underneath. It’s a good idea to plant in vertical stripes, with sun-loving flowers in one strip and green shade plants in the other.
Pros and Cons of having your own vertical garden:

Pros:
- Growing plants up with a tiny footprint.
- Less digging and soil preparation
- Greater plant variety in a smaller area
- Numerous options to build top-down and bottom-up plants.
- Reduced weeding in pots, vertical areas, and beds
- Numerous possibilities for stacking and containers that save space
- Better air circulation
- Lower danger of plant illnesses and pests
- Simpler caring and harvesting, everything done at eye level
- Less bending and laborious lifting
- Greater yields in a smaller area
Cons:
- High initial cost – Prices vary depending on the project, but establishing a living wall system, complete with plants, typically costs between $95 and $165 per square foot.
- Increased energy costs • Demands a great deal of attention and upkeep at first
Other ways to prevent disease
You will be well on your way to preventing the majority of disease concerns if you incorporate the following strategies into your gardening routine.
- Don’t use too much nitrogen fertilizer. Nitrogen encourages rapid and juicy plant growth. The protective outer layers of the plant’s leaves and stems are thus thinner than usual (similar to human skin), making them more vulnerable to insect harm. To prevent attracting insects, use organic fertilizers that release their nutrients gradually. For recommended fertilizers.
- Keep your lawn tidy. Leaves, fruit, and wood that have been infected with illness should be thrown out, not composted.
- Keep your equipment tidy. If you prune sick plants, disinfect your pruning shears by misting them with isopropyl alcohol in between each cut.
- Regularly oiling your shears will make them easier to clean and help them cut more easily. Clean your digging equipment as well.
- Clean up after your shoes. To prevent pests and diseases from spreading from one garden to another, wipe the dirt off your shoes.
- Implement crop rotation. While they wait for the regrowth of their preferred host plants, many diseases remain dormant in the soil from one year to the next. Plant something different in each location every year to thwart them. The annual vegetables are particularly well-suited to this technique.
- Eliminate insects. Numerous insects, such as aphids, bark beetles, and tarnished plant bugs, can transmit illnesses from one plant to another.
Time for action!
Setting up a vertical garden is the best thing you can do for yourself. Not only it will add visual appeal to your space but will provide you with fresh produce all year round from a tiny space.
If you follow this step-by-step guide, you’ll be able to enjoy bountiful harvests from a thriving vertical garden. Sow the seeds today and reap the rewards later.
Happy vertical gardening:)